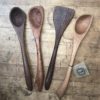
Author Archives: Frank Strazza

New Site and Some Old News!


New Woodworking Website

We recently revamped our whole woodworking website and changed it over to our main website www.sustainlife.org. It is our hope that it will be easier to navigate the different classes and there will be more information easily available to you. We hope to update it with more pictures of the different classes as well as a complete gallery of some of our work. We have a huge selection of work that we have done and that our students have done so we hope we can share it with you.

For all of our blog subscribers, you received an email with the past several blog posts including A Lie-Nielsen show this weekend. Please note, that is OLD news. There is NOT a show this weekend! What happened is that when we switched over to the new site, Feed-burner thought all those blog posts that you all already recieved were new posts. I apologize for any confusion this may have caused.

Now that we have that out of the way, I encourage you to go check out the new site. Let us know what you think. Please post any comments or suggestions below. Also if you see a class that you are interested in but does not have a set date, let us know here. If we have enough interest we will post a date.

We have some other great changes happening in the shop that I will update you on soon, so stay tuned!

Frank Strazza

Lie-Nielsen Event this Weekend


If you live in Dallas and you are looking for something to do this weekend, stop by Woodworld.

Lie-Nielsen will be having a handtool event along with Kevin Drake and Lynn Dowd.

We will be there as well, demonstrating everything from dovetails to inlay!

I will show you how to do stringing, how to inlay a star, how to cut a tapered sliding dovetail and how to cut half blind dovetails.

Lynn Dowd has a huge selection of vintage tools all at a great price. Here is a sneak preview.

Of course Lie-Nielsen has nearly every single tool that they make on display for you to get your hands on and try out.

Kevin Drake will be selling his great cutting/marking gauges as well as demonstrating and selling his new line of turning tools. Rumor has it that David with Northern Custom Hardwoods will be there on Saturday selling some of his walnut. If you want to see some incredible walnut boards you should definitely come by, this man has some amazing wood!

The show is this weekend April 12 and 13 at Woodworld. Click here for the address and the hours. I hope to see you there!

Frank Strazza

Marking Versus Cutting Gauge


This past week we had a fine keepsake box class and cut many dovetails. We used the cutting gauge for marking the depth of the pins and tails so I would like to take this opportunity to iron out any confusion there may be in regards to a cutting gauge versus a marking gauge. Obviously, a marking gauge is for marking and a cutting gauge is for cutting!

More in depth, a good cutting gauge has a knife blade in it, and a marking gauge simply has a pin. The question is: why wouldn’t you just use a marking gauge for marking out your dovetails? The answer lies in which grain direction we are marking. When laying out dovetails you always mark across the grain. If I use a standard marking gauge with a pin as shown in the picture; working across the grain; we will be scratching the surface and tearing the fibers, leaving an unsightly line.


On the other hand if I use a cutting gauge, which has a single bevel knife blade as opposed to a pin; it cuts and severs the cross grain fibers, leaving a beautifully clean and crisp line across the fibers, as shown in the picture.


So what purpose does the marking gauge have? As a general rule the marking gauge, (which has a pin) is used exclusively with the grain. Most marking gauges are also set up as mortise gauges and will have double pins. Mortises are marked with the grain therefore a pin is not at all a problem. The cutting gauge is most often used across the grain but still can be used with the grain. In the past I have sharpened my marking gauge pin to a knife-edge; the problem with this is that you have to make a double bevel which forces the fibers on either side of the bevel.

My cutting gauge has a bevel on one side only, thus leaving a crisp hard edge with the bevel facing the waste side.  A bevel will always bruise the wood; therefore you always want to have the bevel facing the waste side.


I also use the cutting gauge when I am working on cross banding and inlay. It really is my secret weapon for hand tool woodworking. I used it extensively when I made the rose table for cutting across the grain prior to inlay and cutting cross banding to size.

Now the question, where do you find a good gauge?  There are a few cutting gauges out on the market, but most are not well made, unless of course, you want to spend a lot of money. Check these out here!

The main problem that I have found with less expensive gauges is that the blades are not configured correctly, that is, they are not sharpened to the right shape. The other problem that I have found is that the wedge that holds the blade in place does not offer a good positive hold.

Faced with the quandary of needing several gauges for a recent dovetail class, I decided to just make some. Here is the finished gauge, and it works fabulously! I hope to write an article on how to make your own, so stay tuned. In the mean time, we are working on a tool making class which will include making your own cutting gauge. We will keep you posted on the details.

The Woodworking Shows in Our Backyard

Kansas city was a great show with a huge turnout, but Ft. Worth is a whole lot more convenient, especially when traveling and setting up a 30 X 30 booth complete with furniture, displays, a large bench and all the necessary demonstration stuff!

We will be in Ft. Worth this March 8-10 at the big traveling Woodworking Shows. We will have lots of furniture on display including many of the items that you can build in any one of our special furniture making classes.  I will also bring along my recently completed Rose table.

We will have ongoing demonstrations throughout the day, including demos on through dovetails, half blind, and tapered sliding dovetails.

We will be demonstrating on inlay and handplanes. Joe Slack will  do a 1 hour Guitar Making seminar each day in the booth at 2:00. Click here for a list of the seminars.


I am really excited about a new demonstration that I will be bringing to the show. I did a little in Kansas City, so I have included a few pictures here.

The demo is on 17th century wood preparation. I will start with wood that I split from a log with a froe. I will then use a hatchet to rough shape it and then work it down with a wooden scrub plane and jointer plane. It is perfectly straight grain making it the best oak money can’t buy, because it is split as opposed to sawn. Come to the booth and I will explain more about the process and show you how its done!

You can find out more information about the show including directions to the show, right here.

At the Kansas City Woodworking Show 2013!

This weekend, January 25th – 27th  2013,  we are in Kansas City Missouri, to demonstrate at one of the Big Ten Woodworking Shows. Many of you have seen our set up at the Texas shows but we are pleased to be able to do the same in Kansas City. If you are anywhere near the area please stop in. We will be demonstrating hand tool joinery and the use of hand planes as well as inlay and even guitar making. You can check out a complete listing of what we will be demonstrating as well as the times right here. You will also be able to see many of the new class projects that we have developed in the past year. I have also brought along my Roses Table that I just recently finished. You can read more about it here, and if you come to the show you can see it first hand!

As a bonus you will have the opportunity to buy some new tools from Lee-Valley and others. Check out the show and directions here on The Woodworking Shows website. As a side note, if you came out last year they have changed the location so make sure you check out the website for directions.

The show starts this Friday the 25th and runs through Sunday the 27th,  2013.

Hope to see you there!

Frank Strazza

Winners Announced! Texas Furniture Makers Show

On November 17th, about two hundred people gathered at the exquisite Kerr Arts and Cultural Center in Kerrville, Texas for the Texas Furniture Makers Show.

This day is a huge event, and we’ve worked for months in the confines of our shop, even through many nights to bring quality completion to yet another piece to be entered in this show!  This event is also a great time to reconnect with friends, some of whom we may only see this time of year.

The awards ceremony officially began at 5:30 p.m. with refreshments generously  provided to us by the Center. Best Art Style, Best Traditional,  honorable mentions along with the Judges Special awards are some of the categories named. The winners of each category are announced, and each person goes up for the ribbon. People’s Choice is always a favorite because that is what the people vote for.

Best Texas Style went to Lou Quallenberg. I can’t remember a year when he did not win that award!


The lovely Windsor Settee by Caleb James, was one I really liked; he won Best Traditional.


The Best Apprentice prize package was donated by us, the Heritage School of Woodworking. I was very pleased when the award went to John Burton for his lovely blanket chest. John won a one day class as well as a nice package of fine handmade tools made right here at the school. There were many awards given out, and more information can be found on The Texas Furniture Maker’s Show website.

I was thrilled when they announced the winner of the People’s Choice, “Frank Strazza wins People’s Choice for his piece “Roses”!! Then the heart races a little faster when third is announced then second place.

Finally, Best of Show goes to . . . Frank Strazza for Roses! I was beside myself and very honored to receive the award! I am looking forward to using the prize to further my skills; there is so much more to learn and attain to, so on we go!


The following morning the furniture makers participated in a walk around critique on different pieces of furniture in the show. This is always a great opportunity to learn more and to hear what the judges felt about different pieces.


Thank you again to Philip Lowe, from Massachusetts, Randy Johnson  and Gordon McDougal, for coming down to Judge the Show. Also a special thanks to Larry Moss, the Show coordinator for all his hard work to pull it all together.

Here is a complete list of all the winners.

First Place (Best of Show)

Frank Strazza, Waco TX “Roses” Federal Style Hall Table

Second Place

Randolph Secrest, Spicewood TX Trunk

Third Place

Bert Ray, Wimberley TX “Blossom Table II”

Best Contemporary Style

James Breaux, San Antonio TX Haidinger’s Brush” Table

Best Traditional Style

Caleb James, Katy TX Settee

Best Texas Style

Lou Quallenberg, Llano TX “Drift” Coffee Table

Best Art Style

Jeremy Grubb, Dickinson TX “Rising Sun” Console

Best Apprentice

John Burton, Arlington TX Blanket Chest

Woodcraft’s People’s Choice

Frank Strazza, Waco TX “Roses” Federal Style Hall Table

Judges’ Special Award / Fine Woodworking®

Lee Westphal, Burnet TX Display Cabinet

Judges’ Special Award / Alamo Hardwoods

Brooke M. Davis, Austin TX Intertwined Series: Bench

Judges’ Special Award / Alamo Hardwoods

Barry Bradley, Fredericksburg TX “Smoke Signals” Table

Judges’ Special Award / Allen & Allen

Danny Kamerath, Dallas TX “Kampa” Coffee Table

Judges’ Special Award / Dakota Premium Hardwood

Leo Litto, Austin TX Work Table

Furniture Committee Award /Artisans at Rocky Hill

Mark Seay, Plano TX Wind Rose Table

SAPFM Award / Society of American Period Furniture Makers

W. Malcolm Granberry, Houston TX Spine Chest

Woodturners’ Choice Award / Hill Country Turners

Caleb James, Katy TX Settee

Woodcraft® Sponsor’s Award

Lou Quallenberg, Llano TX “Drift” Coffee Table

Johnny Jones Sponsor’s Award

Jon Percy, Austin TX “Fallen Leaves” Bench

Honorable Mentions:

Carl Powell, Bartlett TX KOA Top Table

Wayne Locke, Austin TX Chair

Wayne Delyea, Granbury TX Rocking Chair

Brad Dawson, Kemah TX Curio/Display Cabinet

Brandon Berdoll, Cedar Creek TX Spalted Pecan Coffee Table

“Roses”, Finished Federal Hall Table

As promised here are some photos of my recently finished hall table. When I posted inlaying the bellflowers, I had planned to take ongoing photos of the progress and write several blog articles along the way, but my time has been so consumed with the making of this piece, that I haven’t been able to take the time to write about!

Well here are a few pictures. All the studio photos were shot by Ben Owen. If you get a chance check out his website, he is a wonderful photographer.

You can tell from the pictures why I entitled it “Roses.” The primary wood for the table is mahogany and Asian satinwood.

The serpentine sides are overlaid with oval satinwood insets then crossbanded with mahogany and laced with holly stringing. All the stringing is holly with ebony and holly banding.

The small roses were done using the piece-by-piece method and the Chevalet.

I did the top rose bouquet entirely with a hand held fret saw, using the bevel method. I used multiple woods for the inlay including holly, maple, box elder, Asian satinwood, pink ivory, Indian rosewood, ebony, poplar, lignum vitae and cherry.  There was no dye, stain, or paint used on any of the inlaid roses, although I used an ancient technique of shading using hot sand to “burn” the wood. All the veneer was shop-sawn and finished to 1/16″ thickness.


The drawers are joined with handcut half blind houndstooth dovetails, whew, what a mouthful, and challenging too! The drawer sides are curly maple.

The drawers are crossbanded in mahogany with double holly stringing and satinwood insets. The knob profile mimics the top edge profile, complete with a bentwood holly inset, about 1/32″ in thickness.

The Finish is Danish oil with a hand rubbed French polish.

The piece is currently on display at the Texas Furniture Maker’s Show and will be there through December 8th. I hope you get a chance to get down there and check it out.

Frank Strazza


Texas Furniture Makers Show is Open!

The 13th annual Texas Furniture Maker’s Show in Kerrville Texas, opens today and will run through December 8th  .  As usual, the show displays a large range of innovative ideas in furniture. Had I named it, I might have to call it the Texas 4-legged show! The show consists primarily of tables, one of which I contributed.

I delivered my table on Monday and had a chance to look around at some of the other pieces. I was impressed with the overall quality of the furniture and the fit and finish of many pieces.

The judging and awards ceremony will be held on Saturday, November 17th. One of the main judges is a nationally renowned furniture maker from Massachusetts, Philip Lowe. He specializes in period furniture and is one of the best furniture makers in the country. Some years back, Philip was the head instructor at the North Bennet Street School. He will be giving a lecture on his work at 2:30 on the 17th of November. If you are near the area you won’t want to miss this opportunity to listen to a master. Plus you’ll get to see the furniture at the show too! The cost of the seminar is only $20. For more information go to the website of the Furniture Show and sign up.

I took a few pictures while delivering my furniture, so I will give you a sneak preview of what is there; of course pictures don’t do it justice, so you will have to go and check it out yourself.

Here is Jeremy Grubbs’ table.The detail and finish are nearly flawless.

Here is a beautiful blanket chest made by John Burton.

Alton Bowman outdid himself on this lavishly decorated roll top desk, inlaid with mother of pearl and abalone shell. It is truly an exquisite piece.


Here is the hall table that I made. I will be posting more pictures and some more details in a future post so stay tuned!


Frank Strazza


Completed Workbench Class

We just completed our workbench course, making 4 wonderful benches complete with hard maple tops and bases. We chose a quick release front vise as well as a wagon style tail vise. Tim, our apprentice, made his bench reversed to accommodate his left hand preference!

This was a small group of dedicated guys, and this was one of the most enjoyable classes I have taught. There is something very satisfying about making a tool that you will use for the rest of your working life, or that someone else might use. Knowing that you fashioned it to the best of your ability, putting your blood and sweat into it makes it worth a whole lot more.

We began this 10-day class with the hard maple rough-milled to size. None of the stock was glued up for the tops; it was just jointed and planed and cut to size, ready for joinery.

We started on Monday by mortising the legs and cross stretchers for the bases. I told the class up-front that I did not mind “cheating” a bit by using some power tools. Needless to say, chopping 14 mortises ¾” wide and 2 ½” deep into hard maple by hand would have taken a LONG time, so we drilled out the waste with a smaller bit and then used the . . . hold your breath you hand tool die hards . . . . We actually used the mortise machine with a ¾” bit!! Let me tell you that saved a lot of time.

The next few days were spent cutting and fitting tenons and then gluing up the tops. We worked on pegging the bases with 3/8” oak pegs, as if they would need it—as big and deep as the mortise and tenons are, they would hold up an elephant, but oh well! We turned our attention to the top after we had the base all together. After cutting the tops to size and creating a tenon on the end to accept the end caps, we finally turned our attention to the dovetails.

The top apron is a full 1 ¾” thick on the sides and 2 ¾” on the end caps, with half blind dovetails all the way around. If you have never worked in hard maple, let me tell you it is VERY hard. Everyone’s dovetails turned out great, and even the few gaps were wedged to look seamless.

On to installing vises . . . . 3 benches got the Benchcrafted tail vise. I can’t say enough good about those tail vises. I know they’re a lot of money, but they are worth every penny. Also they really are a breeze to install compared to some others out there.

On the bench I built along with the class, I put one of our shop-built tail vises. It is a bit of work to build and install, but you can’t beat the price. A quick trip to the junkyard and 15 dollars later I had enough scrap aluminum for the main frame. A vise screw from Lee Valley works great as the main screw with some slight modification. For those that don’t mind doing a little metal work, this might be just the ticket for you.

We were able to find some good used Record no. 53 quick release vises for the front, which worked out great. As you may know Record does not make these vises anymore, and they can only be found on the used market, sometimes drawing a lot more money than they used to cost new. For those that can’t get the Record vise, I am really pleased with the Jorgenson quick release vise. I have a great place to get them, and you really can’t beat the price—Tools-plus has a great deal on the 10” vise.

One of the students asked if I would carve his and his wife’s name in the bench. Maple is not the easiest wood to carve, but I was pleased with how it turned out.

We make this exact bench to sell, so if you don’t have the time to come take a class, just drop us a line and we can make one of these benches for you.

If you want to come take a class, the next one is scheduled for 2013. Click here for the next WORKBENCH CLASS.

Below are a few pictures of the process including some happy students with their finished benches!


Making a Dreadnought Guitar

Handmade Guitar

Some of you may not have realized that in addition to our joinery and furniture-making classes, we also offer classes in which you can make a guitar by hand. One student who recently completed our Build a Guitar by Kit class sent us these comments on the class:

This past June, I had the pleasure to enroll and complete the guitar making class at the Ploughshare Institute for Sustainable Culture [Heritage School of Woodworking] in Elm Mott Texas.

Under the careful guidance of Master guitar maker Joseph Slack, I enjoyed an intense week of instruction utilizing a LMI Dreadnought kit. The kit consisted of pre-contoured sides, sound board, backing, bridge, neck, and all the wood/hardware pieces to be cut, chiseled, sanded and carefully assembled into a completed instrument.

Every day of the class, long as they were, I greeted with renewed excitement as the building progressed. Joe’s patience, skilled craftsmanship and sense of humor made the class a pleasure and the final product was one of quality, beauty and most of all, great acoustic sound! To go from a Monday morning pile of wood, to a Saturday night of playing the completed guitar with Joe in the living room of close friends, created a memory that will be recounted for years to come.

Before building this guitar I was playing my Taylor with my friends at our community events, but now, the Taylor sits in its case while the hand built dreadnought takes center stage! I will enjoy playing this instrument for years to come and will gladly pass it along to my children when my journey ends, but for now, they can play the Taylor when they visit!

Jim Vest

Below are photos from the class (click for a larger view).

Guitar-making Photos