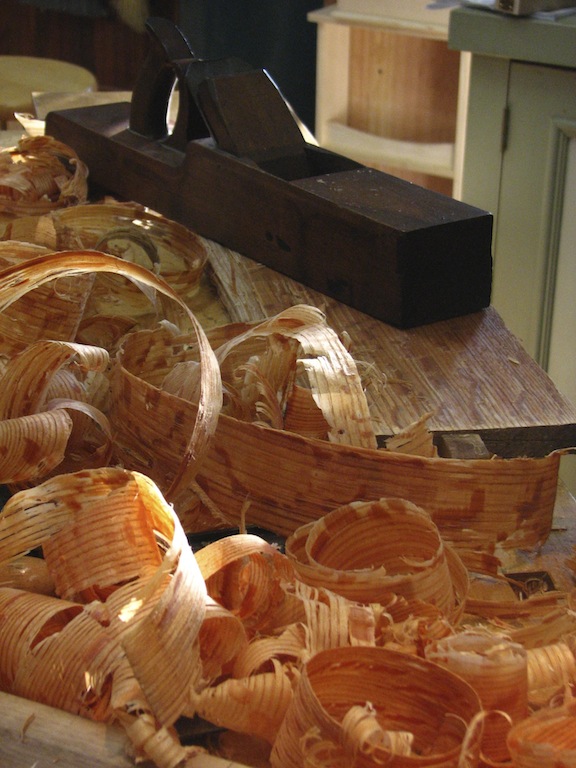
Category Archives: Uncategorized

New Site and Some Old News!


New Woodworking Website

We recently revamped our whole woodworking website and changed it over to our main website www.sustainlife.org. It is our hope that it will be easier to navigate the different classes and there will be more information easily available to you. We hope to update it with more pictures of the different classes as well as a complete gallery of some of our work. We have a huge selection of work that we have done and that our students have done so we hope we can share it with you.

For all of our blog subscribers, you received an email with the past several blog posts including A Lie-Nielsen show this weekend. Please note, that is OLD news. There is NOT a show this weekend! What happened is that when we switched over to the new site, Feed-burner thought all those blog posts that you all already recieved were new posts. I apologize for any confusion this may have caused.

Now that we have that out of the way, I encourage you to go check out the new site. Let us know what you think. Please post any comments or suggestions below. Also if you see a class that you are interested in but does not have a set date, let us know here. If we have enough interest we will post a date.

We have some other great changes happening in the shop that I will update you on soon, so stay tuned!

Frank Strazza

Lie-Nielsen Event this Weekend


If you live in Dallas and you are looking for something to do this weekend, stop by Woodworld.

Lie-Nielsen will be having a handtool event along with Kevin Drake and Lynn Dowd.

We will be there as well, demonstrating everything from dovetails to inlay!

I will show you how to do stringing, how to inlay a star, how to cut a tapered sliding dovetail and how to cut half blind dovetails.

Lynn Dowd has a huge selection of vintage tools all at a great price. Here is a sneak preview.

Of course Lie-Nielsen has nearly every single tool that they make on display for you to get your hands on and try out.

Kevin Drake will be selling his great cutting/marking gauges as well as demonstrating and selling his new line of turning tools. Rumor has it that David with Northern Custom Hardwoods will be there on Saturday selling some of his walnut. If you want to see some incredible walnut boards you should definitely come by, this man has some amazing wood!

The show is this weekend April 12 and 13 at Woodworld. Click here for the address and the hours. I hope to see you there!

Frank Strazza

At the Kansas City Woodworking Show 2013!

This weekend, January 25th – 27th  2013,  we are in Kansas City Missouri, to demonstrate at one of the Big Ten Woodworking Shows. Many of you have seen our set up at the Texas shows but we are pleased to be able to do the same in Kansas City. If you are anywhere near the area please stop in. We will be demonstrating hand tool joinery and the use of hand planes as well as inlay and even guitar making. You can check out a complete listing of what we will be demonstrating as well as the times right here. You will also be able to see many of the new class projects that we have developed in the past year. I have also brought along my Roses Table that I just recently finished. You can read more about it here, and if you come to the show you can see it first hand!

As a bonus you will have the opportunity to buy some new tools from Lee-Valley and others. Check out the show and directions here on The Woodworking Shows website. As a side note, if you came out last year they have changed the location so make sure you check out the website for directions.

The show starts this Friday the 25th and runs through Sunday the 27th,  2013.

Hope to see you there!

Frank Strazza

Texas Furniture Makers Show is Open!

The 13th annual Texas Furniture Maker’s Show in Kerrville Texas, opens today and will run through December 8th  .  As usual, the show displays a large range of innovative ideas in furniture. Had I named it, I might have to call it the Texas 4-legged show! The show consists primarily of tables, one of which I contributed.

I delivered my table on Monday and had a chance to look around at some of the other pieces. I was impressed with the overall quality of the furniture and the fit and finish of many pieces.

The judging and awards ceremony will be held on Saturday, November 17th. One of the main judges is a nationally renowned furniture maker from Massachusetts, Philip Lowe. He specializes in period furniture and is one of the best furniture makers in the country. Some years back, Philip was the head instructor at the North Bennet Street School. He will be giving a lecture on his work at 2:30 on the 17th of November. If you are near the area you won’t want to miss this opportunity to listen to a master. Plus you’ll get to see the furniture at the show too! The cost of the seminar is only $20. For more information go to the website of the Furniture Show and sign up.

I took a few pictures while delivering my furniture, so I will give you a sneak preview of what is there; of course pictures don’t do it justice, so you will have to go and check it out yourself.

Here is Jeremy Grubbs’ table.The detail and finish are nearly flawless.

Here is a beautiful blanket chest made by John Burton.

Alton Bowman outdid himself on this lavishly decorated roll top desk, inlaid with mother of pearl and abalone shell. It is truly an exquisite piece.


Here is the hall table that I made. I will be posting more pictures and some more details in a future post so stay tuned!


Frank Strazza


Completed Workbench Class

We just completed our workbench course, making 4 wonderful benches complete with hard maple tops and bases. We chose a quick release front vise as well as a wagon style tail vise. Tim, our apprentice, made his bench reversed to accommodate his left hand preference!

This was a small group of dedicated guys, and this was one of the most enjoyable classes I have taught. There is something very satisfying about making a tool that you will use for the rest of your working life, or that someone else might use. Knowing that you fashioned it to the best of your ability, putting your blood and sweat into it makes it worth a whole lot more.

We began this 10-day class with the hard maple rough-milled to size. None of the stock was glued up for the tops; it was just jointed and planed and cut to size, ready for joinery.

We started on Monday by mortising the legs and cross stretchers for the bases. I told the class up-front that I did not mind “cheating” a bit by using some power tools. Needless to say, chopping 14 mortises ¾” wide and 2 ½” deep into hard maple by hand would have taken a LONG time, so we drilled out the waste with a smaller bit and then used the . . . hold your breath you hand tool die hards . . . . We actually used the mortise machine with a ¾” bit!! Let me tell you that saved a lot of time.

The next few days were spent cutting and fitting tenons and then gluing up the tops. We worked on pegging the bases with 3/8” oak pegs, as if they would need it—as big and deep as the mortise and tenons are, they would hold up an elephant, but oh well! We turned our attention to the top after we had the base all together. After cutting the tops to size and creating a tenon on the end to accept the end caps, we finally turned our attention to the dovetails.

The top apron is a full 1 ¾” thick on the sides and 2 ¾” on the end caps, with half blind dovetails all the way around. If you have never worked in hard maple, let me tell you it is VERY hard. Everyone’s dovetails turned out great, and even the few gaps were wedged to look seamless.

On to installing vises . . . . 3 benches got the Benchcrafted tail vise. I can’t say enough good about those tail vises. I know they’re a lot of money, but they are worth every penny. Also they really are a breeze to install compared to some others out there.

On the bench I built along with the class, I put one of our shop-built tail vises. It is a bit of work to build and install, but you can’t beat the price. A quick trip to the junkyard and 15 dollars later I had enough scrap aluminum for the main frame. A vise screw from Lee Valley works great as the main screw with some slight modification. For those that don’t mind doing a little metal work, this might be just the ticket for you.

We were able to find some good used Record no. 53 quick release vises for the front, which worked out great. As you may know Record does not make these vises anymore, and they can only be found on the used market, sometimes drawing a lot more money than they used to cost new. For those that can’t get the Record vise, I am really pleased with the Jorgenson quick release vise. I have a great place to get them, and you really can’t beat the price—Tools-plus has a great deal on the 10” vise.

One of the students asked if I would carve his and his wife’s name in the bench. Maple is not the easiest wood to carve, but I was pleased with how it turned out.

We make this exact bench to sell, so if you don’t have the time to come take a class, just drop us a line and we can make one of these benches for you.

If you want to come take a class, the next one is scheduled for 2013. Click here for the next WORKBENCH CLASS.

Below are a few pictures of the process including some happy students with their finished benches!


Upcoming Dining Chair Class

Don’t miss out on this one-time class offering for our sturdy but comfortable Brazos dining chair. This class is just 2 weeks away!

We designed this comfortable chair here in our shop, and our craftsmen have been building it for our customers for over 15 years.

We will guide you through hand-cutting 30 mortise- and-tenon joints to assemble the frame of the chair. The arms are joined with carefully cut “through tenons,” where the front leg protrudes through the arm. The angled tenons that connect the front and back of the chair will expand your skill set, and the cabriole style legs are a great way to learn shaping with a spokeshave. The arched seat rails and gently sculpted seat will finish off your heirloom chair.  You will leave the class with one armchair and the skills and patterns to be able to finish off a set at home.

We are offering this chair in solid Black Walnut or Black Cherry (shown). If you are interested in taking this course please sign up soon. The class dates are this month, July 23 – 28. The prerequisite for taking this course is the Foundational Course. To register for the Brazos Dining Chair just click the link!


Dresser Course Completed!

Wow, we’re done! No it didn’t take 5 weeks, it’s just that I have finally recovered enough to write about it! It really was a great 2 weeks with 5 enthusiastic students. Each one completed a dresser with over 75 hand cut dovetails! The drawers were done with half blind dovetails in the front with through dovetails in the back and then solid drawer bottoms that were hand planed to a beveled edge to fit in a groove in the drawer side.


We used soft maple for all the internal drawer parts. Larry did a super job on his dovetails. He decided to make his dresser out of walnut, which contrasted very nicely with the maple. Larry chose to do needle point dovetails, which are quite challenging. This was his first attempt at that style dovetail but the results were top notch.

Carl had to leave early on Saturday, so here he is with his finished cherry dresser.


Here is the rest of the group with their finished dressers late on Saturday afternoon.

I have mixed emotions at the end of a 2-week class. It’s sad to see all my friends leave after having spent so much time together. It is rewarding to see them leave with such an accomplishment after much hard work.


Some of you know that most of the wood is pre-milled before and sometimes during the class. This is just in the interest of time; if we had to mill all the wood during class, we would have people standing around waiting and it would add a lot more time to the class. Plus we want to focus more on the hand skills such as the joinery and surface preparation during class. Having said that, the wood milling for this class is a HUGE job. So on behalf of the class I want to say a BIG THANK YOU to Jonathan for doing such a great job, for tirelessly milling all the wood for the class so perfectly.

Dresser Class 2012


We are well into our annual dresser course with 5 students, each making a beautiful 4-drawer dresser that they will take home at the end of this 2 week class. The week started by hand planing and scraping the insides of the chest sides, then each person hand cut 8 dado joints and then 12 mortise-and-tenons that hold the middle frames together. By the fourth day, all the carcasses were assembled. Then each student, with deep focus, turned to carefully cutting and paring the front dovetail pieces that will hold the front frame together.

Here is Larry assembling the back frame complete with raised panels and mortise-and-tenon joints.


You must understand some of these are business executives, some retired and some not. One student told us his friends think he is crazy for not using his 2 week vacation to go to France or something like that. But he has chosen to spend his 2 week vacation building an heirloom piece of furniture, one that will be around for hundreds of years. Long after that trip to France would have been forgotten, the memories of the man who built this dresser will live on, as will his own memories of having built this piece! So in my opinion this is the best vacation that one could take!

Even now, this evening, as I sit and write, I hear the soft tap of a mallet as it carefully strikes the chisel and the swoosh of the chisel as it pares through black cherry, then the blow of the craftsman as he blows the wispy shavings out of the way. These are the few students who have chosen to stay late into the evening, working with their hands creating timeless furniture of beauty and simplicity, with joinery that will stand the test of time.

Stay tuned, and I will try to keep you posted with the progress!

A Clearer Picture

Thanks to a generous donation from Landon Marx, one of our students, we’ve recently added a high quality video camera and a High Definition L.E.D. Screen to our teaching facility!

This new setup really makes teaching the fine details a breeze. Details are very important when working with hand tools, and now everyone in the class can see a clear, close up view of all the fine points that I am trying to communicate.

The idea of having a live, bench-mounted camera came from Roy Underhill. Our setup is pretty simple – I modified a camera tripod and attached it to a piece of wood so I can move it wherever I need to on the bench. An HD video camera is mounted on the tripod, and I used an HDMI cable to connect the camera to a large screen.  The screen is positioned where everyone in the class can see it easily. (The only disadvantage to this setup is that now any mistakes I make are also magnified 100 times!)

We’re excited about this new improvement, and we look forward to you coming back and taking more classes with us.

Thank you again, Landon!

At the Kansas City Woodworking Show 2013!

This weekend, January 25th – 27th  2013,  we are in Kansas City, Missouri, to demonstrate at one of the Big Ten Woodworking Shows. Many of you have seen our set up at the Texas shows but we are pleased to be able to do the same in Kansas City. If you are anywhere near the area please stop in. We will be demonstrating hand tool joinery and the use of hand planes as well as inlay and even guitar making. You can check out a complete listing of what we will be demonstrating as well as the times right here. You will also be able to see many of the new class projects that we have developed in the past year. I have also brought along my Roses table that I just recently finished. You can read more about it here, and if you come to the show you can see it first hand!

As a bonus you will have the opportunity to buy some new tools from Lee-Valley and others. Check out the show and directions here on The Woodworking Shows website.

The show starts this Friday the 25th and runs through Sunday the 27th,  2013.

Hope to see you there!