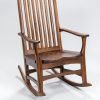
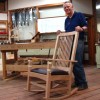
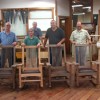
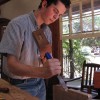
Our students often ask how to finish their projects, be it a rocking chair or table. Often times we have just enough time to complete the piece, and don’t have time to apply a finish. Although applying the finish is not hard it requires a step by step methodic approach which I have outlined here.
First you will need to obtain a few supplies shown in the picture below. We use Danish oil made by Deft (read the caution label on the can prior to using). It is somewhat hard to find but can be found through different online sources, it is also available here at our Homestead General Store. You will also need some rubber gloves and cotton rags. You will need some 320 grit sandpaper and 0000 steel wool to buff between coats.

The first step to obtaining a good oil finish is to smooth the surface well, prior to applying the finish. Start by scraping it with a cabinet scraper and then finishing with a card scraper.

Next sand with the grain using 220 and 320 grit sandpaper. At this point you can buff it out with 0000 steel wool if you like. Sometimes I skip this step and other times I have even used leather to buff it out prior to finishing. You will find that some woods finish better than others. It really depends on the grain of the wood, I have found that cherry finishes much better than walnut because of its closed grain, walnut has more of an open grain, thus taking more time to build a finish.

Once you have scraped and sanded, it is now time to apply the first coat of finish. Apply the oil liberally and let it soak in. Within the first 5 minutes the oil will soak into the grain quickly. Keep the surface wet, by applying another coat. Let it sit on the surface for about 20 to 30 minutes and then wipe off the excess with a clean cotton cloth. Set it aside to dry for about 24 to 48 hours. The drying time depends on the humidity and temperature, if it is cold out you will want it to sit for a longer time.

The first step BEFORE applying the second coat is to sand the surface with 320 grit sandpaper, to remove any rough spots and to smooth any raised grain. If the sandpaper gums up while sanding, the finish is not dry enough and should sit longer. Depending on how smooth the surface is, you can skip the sanding and simply buff the surface with 0000 steel wool prior to applying any oil.

Now wipe on a liberal amount of oil. This second coat will not soak in like the first coat but will start building up the finish. You will be able to tell a noticeable difference to the finish at this point.

Let this coat sit for about 20 minutes or until it starts getting a LITTLE tacky. You don’t want it to get too sticky because it will be a nightmare trying to remove the excess! At this point you want to remove the excess with a clean rag. Make sure that all the excess is wiped away. Let it dry for another 24 to 48 hours. The longer it dries the better.

Applying the third coat is much like applying the second coat, except that I don’t usually sand or steel wool between coats at this point. It won’t hurt it, it’s just not necessary unless the finish feels a bit rough. Apply the third coat of oil and let it sit for about 20 minutes, then wipe off all the excess. Let it dry well. You can apply as many coats as you like but I have found that 3 to 4 coats works just fine.
The oil finish works very well on most hard woods. I don’t usually use it on soft wood such as pine. I like to use the Deft spray lacquer or shellac for soft woods and smaller projects.
The oil finish process is quick and easy and does not require a dust free environment which makes it a user friendly finish.
One word of caution, MAKE SURE TO LAY OUT YOUR RAGS FLAT TO DRY IMMEDIATELY AFTER OILING or else they will spontaneously combust if they are bunched together. Many a shop, house, and truck has burnt to the ground because rags were left bunched up and thrown into a corner. Even if there is a little oil residue on the rag, lay it flat and set it aside to dry, after it is hard and dry then dispose of it.

Here is the finished chair after 3 coats of oil. Happy finishing!
