Category Archives: Spoon Carving

Upcoming Carving Classes

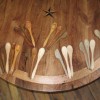
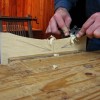
Just a quick note to let you all know, this weekend we will be having two carving classes. These two classes are distinctly different but will be very informative and interesting indeed.

The first of the classes, held this Friday June 24th will be on chip carving. This form of carving differs from most carving in that it requires very few tools. In fact all the carving is done primarily with only one knife! You can do the work sitting down and you can even do it in the comfort of your own home.

In this class we will cover sharpening as well as layout, and then move into carving borders and rosettes. The last thing we will cover is how to carve lettering. This is really a great way to personalize your work or just make a stand alone piece. If you are interested in attending this course it will be held this Friday June 24th, you can register here. CHIP CARVING CLASS

The next course of interest is this Saturday June 25th. It is on Spoon carving.  You will leave with a spatula, a spoon, and a ladle, all hand carved! You can actually read an earlier post on the last spoon carving class by clicking the link, SPOON CARVING CLASS.

To register for this class simply click here and sign up!

I hope to see you all this weekend!

A Spoon Carving Class!

Our first spoon carving class opened up Saturday with 6 students and what a great day! This is just one of the many new classes that we are offering this year.

I started out by teaching tool sharpening. This is often overlooked when working with hand tools. Folks often wonder why they are not getting the smooth cut they are looking for and while there are often several things that could contribute to this problem, the  first thing I check is the sharpness of the blade.  Then I check to see how far the blade is protruding from the tool. After we were all sharpened up we moved right into working with the grain direction, this is a subject that can easily be overlooked.

We want to look at which way the grain is going, and not only that, but in a curve, such as a spoon the grain is often changing many times. For example when you are carving a curve you want to work downhill with the tool. (See the picture below) Think of the grain as a bunch of little straws or hairs bunched together, when you stroke the hairs you want to work with the hairs, not against them, so as not to cause them to lift. After time spent getting used to the spokeshave, we shaped a spoon in pine, using the stop-cut method and a chisel to shape the outline. Then the shape was finished up with the spokeshave.

We went on to shaping a black walnut spatula. All the students then made a spoon out of mesquite, which is a native Texas wood. Mesquite is a great wood to carve and it scrapes wonderfully. The shape of the spoon was pre-cut on the band-saw and then the bowl was shaped with a gouge. I have found that the Swiss made gouge, sweep 7 and 20mm wide works quite well. The rest is shaped with a spokeshave and finished with a scraper.

Below are a few pictures of the class in progress!

For the last project, everyone made a ladle. After using the gouge to shape the bowl, I then introduced the drawknife to shape the outside shape and curves of the ladle. This was finished up with the spokeshave and scraper. After sanding and rubbing out with fine steel wool, we finished by rubbing down with walnut oil.

I even showed them how to make a spoon from a walnut log, using a hatchet, drawknife, spokeshave and scraper; I will talk about this in another post!

Here are the finished spoons after a day’s work!

Everyone left quite happy and fulfilled after a day’s worth of working with their hands. To register for the next spoon carving class, click the link SPOON CARVING CLASS