Tools for Setting up a Blacksmith Shop

Setting up a blacksmith shop for home use is not that difficult. You can get everything you need for about $300-500 if you buy used equipment and make what you can yourself. To get started with blacksmithing, the main tools you’ll need are a forge, an anvil, a vice, hammers, and tongs. One of the great things about blacksmithing is that you can make many forging tools yourself, as you go.
A Forge for Blacksmithing
The forge is what you’ll use to heat the metal that you’re working. It consists of a firepot, to hold the fire, a work surface, and a blower. The firepot should be about 4-5 inches deep and can be made from an old brake drum. The forge I use is made of brick, and firebrick and is more substantial, but I’ve also seen forges on old farms made from concrete poured into a tractor tire, with a depression for the firepot. You can find blowers in antique stores or salvage them from air conditioning units, clothes dryers, or other used appliances. My dad’s first forge was basically a brake drum with legs. The blower was an old hair dryer!

Anvil
Unless you have a lot of money to spend, it’s best to start with a used anvil. You can find them for about $1-2 per pound. Even if an anvil has some dings, it can be cleaned up and resurfaced if necessary, and it will work just fine. A “wanted” ad in the paper is a good way to find these and other blacksmithing equipment. We’ve also found anvils and other blacksmithing equipment at farm sales, estate sales, and farm auctions.

Blacksmith Hammers
You can start with a basic ball pein or a cross pein hammer. You can usually find these at local hardware stores. You can also order various types of blacksmith hammers from a blacksmith supply house. Once you develop some skill with blacksmithing, you’ll be able to make hammers.

Types of Vises
There are two main types of vises, the post vise and the machinist’s vise. A postvise is the blacksmith’s vise. It is designed to stand up to the hammering. Machinist vises, particularly the smaller ones, can be damaged from the repeated hammer blows. The place to look for post vises is farm auctions and estate sales. If you’re not able to get a post vise, you can start with a machinist’s vise. It’s best to get a larger vise that will stand up to the hammering well, and you’ll need to fit it with smooth jaws so that it won’t mar the workpieces.

Blacksmithing Tongs
Over time, you’ll need many different tongs, one or two for each thickness of metal that you work with. Having tongs that are the right size for your materials makes it much easier to keep a good grip on your metal and improves the quality of your work. But for starters, you only need about 1-2 pairs, which you can buy for $30-40 each from a blacksmith supplier. After you’ve gained some experience blacksmithing, you’ll be able to make your own tongs. Usually, by the end of our two-day blacksmithing class, our students are ready to begin learning the skills of tong making.

Other Tools for Blacksmithing
You’ll also use drifts, slitters, center punches, twisting tools, and chisels. These are all tools that you will be able to make yourself as you develop your skills.

Where To Learn More
We teach several classes on blacksmithing that are designed to take you from beginner up through an intermediate stage of blacksmithing skills (see Blacksmithing I and Blacksmithing II). We also teach a class on how to make an Ax, how to make blacksmithing tongs, and how to improve your hammer and forging technique.
Or stop by and visit our shop. We are open year round, Monday through Saturday at:
608 Dry Creek Rd
Waco, Texas 76705
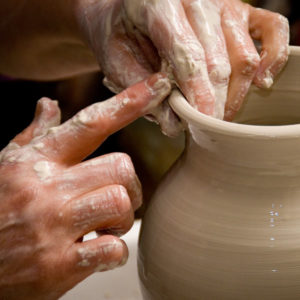 Potters have been digging and processing their own clay for millennia. It has only been since the Industrial Revolution, which began in the 1800s, that clay started being sold by suppliers on the market. Before that time potters situated themselves near a good source of clay and always the trade was passed down from generation to generation. In many places such as China, Korea and Great Britain whole families of potters would build small towns near a clay source and the local economy centered on pottery making.

 After a recent first-time visit to the Ploughshare campus and