Setting up a blacksmith shop for home use is not that difficult. You can get everything you need for about $300-500 if you buy used equipment and make what you can yourself. To get started with blacksmithing, the main tools you’ll need are a forge, an anvil, a vice, hammers, and tongs. One of the great things about blacksmithing is that you can make many forging tools yourself, as you go.
A Forge for Blacksmithing
The forge is what you’ll use to heat the metal that you’re working. It consists of a firepot, to hold the fire, a work surface, and a blower. The firepot should be about 4-5 inches deep and can be made from an old brake drum. The forge I use is made of brick, and firebrick and is more substantial, but I’ve also seen forges on old farms made from concrete poured into a tractor tire, with a depression for the firepot. You can find blowers in antique stores or salvage them from air conditioning units, clothes dryers, or other used appliances. My dad’s first forge was basically a brake drum with legs. The blower was an old hair dryer!
Small forge and blower
Anvil
Unless you have a lot of money to spend, it’s best to start with a used anvil. You can find them for about $1-2 per pound. Even if an anvil has some dings, it can be cleaned up and resurfaced if necessary, and it will work just fine. A “wanted” ad in the paper is a good way to find these and other blacksmithing equipment. We’ve also found anvils and other blacksmithing equipment at farm sales, estate sales, and farm auctions.
Anvil and other tools
Blacksmith Hammers
You can start with a basic ball pein or a cross pein hammer. You can usually find these at local hardware stores. You can also order various types of blacksmith hammers from a blacksmith supply house. Once you develop some skill with blacksmithing, you’ll be able to make hammers.
Ball pein and cross pein hammers
Types of Vises
There are two main types of vises, the post vise and the machinist’s vise. A postvise is the blacksmith’s vise. It is designed to stand up to the hammering. Machinist vises, particularly the smaller ones, can be damaged from the repeated hammer blows. The place to look for post vises is farm auctions and estate sales. If you’re not able to get a post vise, you can start with a machinist’s vise. It’s best to get a larger vise that will stand up to the hammering well, and you’ll need to fit it with smooth jaws so that it won’t mar the workpieces.
Post vice
Blacksmithing Tongs
Over time, you’ll need many different tongs, one or two for each thickness of metal that you work with. Having tongs that are the right size for your materials makes it much easier to keep a good grip on your metal and improves the quality of your work. But for starters, you only need about 1-2 pairs, which you can buy for $30-40 each from a blacksmith supplier. After you’ve gained some experience blacksmithing, you’ll be able to make your own tongs. Usually, by the end of our two-day blacksmithing class, our students are ready to begin learning the skills of tong making.
Three types of tongs
Other Tools for Blacksmithing
You’ll also use drifts, slitters, center punches, twisting tools, and chisels. These are all tools that you will be able to make yourself as you develop your skills.
Tools made by the blacksmith: Hardie cutoff, cold chisel, center punch, and set hotcut
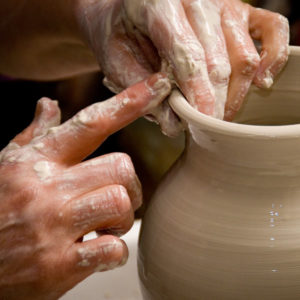
Potters have been digging and processing their own clay for millennia. It has only been since the Industrial Revolution, which began in the 1800s, that clay started being sold by suppliers on the market. Before that time potters situated themselves near a good source of clay and always the trade was passed down from generation to generation. In many places such as China, Korea and Great Britain whole families of potters would build small towns near a clay source and the local economy centered on pottery making.
Clay is a smooth soft rock made up of mineral particles as fine as dust. Clay particles are all that remain of rocks such as feldspar after these have weathered and decomposed. Most clay remains at the site where it formed thus making a clay deposit. In its undeveloped state, it is one of the few natural resources that has no perceptible value of its own yet can be transformed into some of the most valued works of art.
Today, many potters caution that it is hardly worth the effort and time to dig your own native clay while others strongly encourage those that are able to take advantage of this abundant resource. A potter can also gain a great deal of practical experience and vastly broaden his or her knowledge by going out and digging one’s own clay and feeling the fulfillment of actually making a pot from the ground up.
Here at our shop quite a number of people ask if we use clay from the Brazos River, which borders our farm. We have been unable to utilize Brazos River clay because of a major lime contamination. A good part of this is due to the high limestone cliffs just above the river and every time it rains more limestone washes down the banks contaminating the very absorbent clay. James Chappell, author of, The Potter’s Complete Book of Clay and Glazes, says, “ While the presence of alkalies can be tolerated,the presence of lime cannot; when such clay is fired, the lime turns into calcium oxide, which will absorb water, expand inside the pot and cause it to crack, flake or chip.”
There are two basic clay bodies, earthenware and stoneware. Earthenware can only be fired up to the temperature range between 1700 degrees (F) and 2000 degrees (F). Because of this it is not waterproof and the finished product can be chipped or scratched easily. Stoneware is much less common than earthenware, yet it is highly sought after for it’s durability and lasting strength. This type of clay can be fired up to 2400 degrees (F) to become vitreous [meaning ‘like a rock’] making it water proof even when left unglazed, thus the name, stoneware.
About four miles from the Northern branch of our Ploughshare school, in Idaho, is a large deposit of kaolin called Helmer kaolin. The mineral kaolin is an extremely refractory clay with a melting point at 3200 degrees (F). It cannot be used alone as a clay body due to its highly nonplastic texture. Because of this it must be combined with other clays to increase its plasticity and lower its maturing temperature. However, this clay is very durable and has a low rate of shrinkage thus making it one of the most sought after ingredients for making pottery found in the United States. We have yet to work with it ourselves but we are looking forward to the possibility of finding a native clay source with which we could supply the needs of our school and craft shop.
“Cheeeep cheeeeeep.” That was an unusual noise to hear in a beehive. I had just begun beekeeping at the time, and it seemed that the bees were always doing something new. As I opened the hive I heard the sound again. It sounded like a mouse, but it was April, and I did not expect to see mice in the hive at that time.
During winter, bees will cluster in a tight ball around the combs to keep warm, and mice will often move in to make their nests. But the hive was overflowing with bees on this warm spring day, and it didn’t seem like a mouse would find any comfort in that environment.
As I removed the combs in search of the chirping noise, I saw something I had never seen before. On the side of a comb, the bees had built a one-and-a-half inch long cell, which was round and tapered. Something inside was eating its way out of the cell.
Suddenly the chirping noise began again from within the cell. “Help me out,” it seemed to say. Each time it chirped, worker bees on the comb would come running to the cell. Tearing at the cell, they soon opened it, and a bee much larger than all the others crawled out. It was a queen bee!
While I was still trying to determine what was happening, the bees within the hive seemed to get very excited. They began moving around very quickly. About a minute later, half the bees in the hive, together with the old queen, started flying into the air. For just a moment, they hovered over the hive as if to say, “Goodbye,” and then they flew over the trees and were gone. The bees had just swarmed.
Swarming
Swarming is a honeybee colony’s natural way of producing new colonies. However, as beekeepers, we want to prevent swarming and keep as many bees in our hives as possible. When the hive swarms, it is the older bees that leave—the bees that were bringing in most of the honey. With only young bees left in the hive to take care of a new queen, honey production will decrease, as will your harvest of honey.
Before addressing several methods for swarm prevention, let’s discuss some of the reasons for swarming. This will help us to get a broader perspective on general hive activity and maintenance.
There are two main causes of swarming, both of which are related to the bees’ ability to build comb. First, they will swarm if they have run out of space to build new comb. Secondly, they will swarm if they cannot build comb quickly enough to store the incoming nectar.
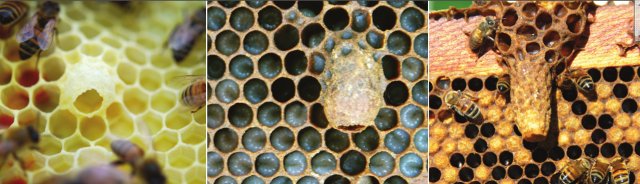
In both conditions, the bees will prepare to swarm by building about 15 to 20 queen cells along the edges of the combs. Since the average life span of a queen is two to three years, the building of new queen cells is not a part of normal everyday hive activity. So if you see queen cells in a hive, it is a sure sign that either the queen has died or that the hive is preparing to swarm.
Queen Cells at Various Stages of Development
After the queen cells have been built, the queen will lay an egg in each cell, which will hatch three days later as larvae. Worker bees feed each larva a high protein substance called royal jelly, and after four days of feeding, the larva spins a cocoon.
Sixteen days after the eggs are laid, the new queens will start rubbing their wings together, which makes the chirping sound mentioned above, and that warns the mother queen that it’s time to leave the hive. The new queens will then chew their way out of the cells. At first the new queens will search through the hive for other queens. When they meet, the queens will fight to determine which one will dominate the hive, and the strongest queen will kill the other queens with a fatal sting.
As soon as the new queens start hatching, the mother queen and approximately half the bees will swarm out of the hive. Initially, they will search for a temporary landing site, such as under the eaves of a house, that offers some protection from wind and rain.
When they land, they will cluster into a ball and will usually spend three to four days at that site. Scout bees will then leave the cluster in search of a place to build a new hive. This could be any number of places, including a birdhouse, an old hot water heater, the eaves of a house or inside a hollow portion of a tree.
Once the scouts have found a suitable location, they will return to the cluster and signal the prospective new location to the other bees. The swarm of bees will then fly to the new location to decide whether it is suitable. If it is, they’ll begin building a new hive. If it’s not found to be suitable, the scouts will be sent out again to repeat the process.
As beekeepers, one of our jobs is to provide the bees with ample space in the hive. In the springtime, when flowers are producing the most nectar, it is especially important to check your hives at least once every two weeks to see how fast the bees are building comb. The bees can build one comb a night if there has been a substantial amount of rain, and if plenty of nectar-producing flowers are blossoming.
If the bees continue at this rate, they will soon run out of room to store the honey that they are bringing in. Then they will begin to make preparations to swarm. As I mentioned earlier, you can tell that a hive is preparing to swarm by the presence of queen cells. If I find queen cells when inspecting my hives, I will remove them by cutting them off of the comb. This will temporarily halt the swarming process, but then I also need to address the reason that they were preparing to swarm in the first place.
How to Prevent Swarming
When I find a hive that has begun preparing to swarm, I will monitor the hive and try to make sure the bees always have enough space to build at least three combs. If the bees start to run out of space in the hive, there are a couple of things I will do.
First, I will harvest the combs that are filled with honey. This immediately creates additional space in the hive. If at this time the bees are still building more queen cells, indicating that they will swarm, then I will remove two or three combs of brood from the thriving hive and place them in a weaker hive—a hive that contains fewer bees and proportionally fewer brood combs and honeycombs. This supplies the weaker hive with more bees and more honey, and can stimulate the queen in that weaker hive to lay more eggs each day, further strengthening the hive. At the same time, this frees up more space in the stronger hive for building comb.
If the bees still exhibit a tendency to swarm, I will next switch the location of the strong hive with that of a weaker hive. Being creatures of habit, bees that have left the hive to forage will return to the place their hive was when they left it. Bees that had been in the stronger hive, will end up in the weaker hive, thus strengthening it while reducing the bee population in the stronger hive.
Conclusion
Sometimes, despite my best efforts my bees have still swarmed. Beekeeping has its challenges. As a beekeeper, I continue to enjoy learning about and discovering the different happenings in the life of a hive.
which was published in the June/July 2013 issue of Mother Earth News. Bryan is the Publisher and Editorial Director of Mother Earth News.
In the article, Bryan describes the desire he had as a child to be Amish. He was inspired by their farming with draft animals, their growing of their own food and their modest, cooperative lifestyle. He describes the Homestead Heritage community and gives a picture of what you will experience on a visit: “industrious activity, friendly faces and a pervading sense of happy people doing work they enjoy.” Bryan recognizes the beauty and importance of a traditional lifestyle that emphasizes simplicity, modesty and working in close relationship with the land and in harmony with one another. From his perspective, Homestead Heritage is a “genuine example of a self-sufficient group of people providing sustenance to each other.”
This year, The Ploughshare together with Homestead Heritage is cosponsoring the 25th annual Homestead Fair on Thanksgiving Weekend, Friday – Sunday, November 23-25, 2012. We invite you to attend.
Activities for the Entire Family
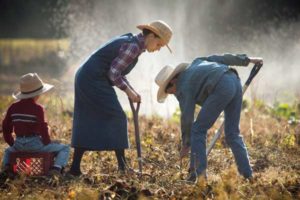
Everyone in the family can watch, learn about and participate in a wide variety of activities, including milking a goat, making soap, helping to raise a timber frame barn, preparing and spinning cotton into yarn or watching a master craftsman fashion a fine Windsor chair straight from a rough log. Other activities include hands-on projects, sheepdog herding, horse farming, pottery, blacksmithing, woodworking, quilting, weaving, spinning, basketry, boot making, cheese making and much, much more.
Great Food
Sample the multicultural dishes from our food court—from hamburgers to Israeli falafels, sourdough pizzas, tacos and gorditas, egg rolls and more, all home made fresh from the farm. Enjoy a delicious sorghum pecan ice-cream cone, apple cider donuts, or a bag of kettle corn while touring our farm on a horse-drawn hay wagon.
Hands-on Activities
Children especially enjoy the hands-on activities, in which they can learn to:
make a candle
weave a basket
build a bird feeder
make a toy sailboat
weave a coaster
hand-hammer a brass spoon
shell popcorn
braid a dog leash
or many others
Adults can try their hand, too, and one of the high points of the Fair is parents working with their children on these projects.
Seminars on Sustainability
The Fair also features a number of in-depth and practical seminars on sustainability. Most seminars last about 30-40 minutes, with a time for questions afterward. Topics are still being finalized in preparation for the Fair, but the preliminary list includes:
Seminars on important aspects of sustainable culture
Small-scale family farming
Sustainable gardening
Raising and caring for backyard chickens and other poultry
Beekeeping
Food preservation
Cheese and bread making
Sustainable energy
Sustainable building with local materials
Creative writing workshop, and more.
Music and Singing
Lively and moving music is a central part of the Fair, with our bluegrass musicians, our Homestead orchestra and adult’s and children’s choirs.
Unique Opportunities for Holiday Shopping
You will also find unique opportunities for holiday shopping with a great variety of unique hand-crafted items, from soaps to leather goods to pottery, quilts and other products made by our craftsmen and children.
Admission
Parking passes—good for all three days of the Fair—are available for $10.00 per vehicle on site, or you can pre-order them for $7.00 online. There is no entrance fee.
More Information about the Fair
For more information, including driving directions, camping and lodging information, food and events at the fair, visit the Homestead Fair website at:


 Potters have been digging and processing their own clay for millennia. It has only been since the Industrial Revolution, which began in the 1800s, that clay started being sold by suppliers on the market. Before that time potters situated themselves near a good source of clay and always the trade was passed down from generation to generation. In many places such as China, Korea and Great Britain whole families of potters would build small towns near a clay source and the local economy centered on pottery making.
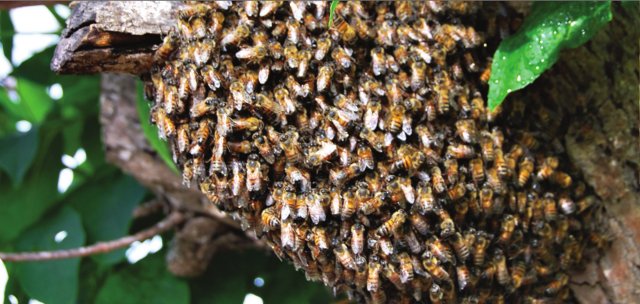
 After a recent first-time visit to the Ploughshare campus and